System Settings Panel

This panel is located at the Rules Area.
It's used for defining the general rules of the strategy:
- whether it enters fresh new Positions each month,
- the number of Positions to hold at any given time,
- whether it's trading long or short Positions,
- the instrument to enter when Positions are closed,
- calculating the Limit Order's prices,
- and more.
1. System: this rule defines whether the strategy switches (replaces) Positions periodically at a certain date of the month, or, switch Positions continuously when any of them hits the Sell Filters.

If you have a restricted license, you may not see this rule. Thus your strategy will be locked in either Periodic or Continual switching (based on your license). Please contact our Customer Support at support@portfolioboss.com if you wish to upgrade your license.

The “Periodically Switch Positions” will replace all old Positions with new Positions during the switch-date (each month). So old Positions will be sold during this switch-date (even if they're still safe, not triggering the Sell Filters), and then you buy new instruments to replace them.
If a Position hits a Sell Filter before the switch-date, you'll receive a signal to exit that Position and then buy the cash-equivalent instrument.

These new Positions are selected based on the strategy's Buy Filters (or Short Filters, if it's a short strategy); instruments that passed the Buy Filters are then ranked with the Ranking Rules. If the strategy holds open, say, 10 Positions at any given time, then PB will recommend the top 10 (ranked) instruments for you to buy. Take a look at this diagram.
Keep in mind, all instruments within the strategy's Portfolio will be tested by the Buy Filters and then ranked by the Ranking Rules. So if an old Position (the old instrument) passes the Buy Filter again and ranks in the top 10, PB will tell you to hold that Position instead of replacing it.

The idea for periodic switching is that you're not bound to your current Positions (unless a Sell Filter is triggered), lest there are more profitable Positions to enter. PB will look for more profitable Positions based on the Buy Filters and Ranking Rules.
In short, you don't want wasted opportunities by clinging onto your current Positions for too long. Another advantage is that your trades mostly happen on a single, certain day of the month, thus reducing commission fees as well as minimizing slippage.
Another reason for periodic switching is that all Positions' weight (the money contained in each of them) will be distributed equally at the switch day. So if a Position wins huge, its gain will be used to fund the other Positions as well, instead of being locked into it in a lopsided weighting (which is the case in a continuously-switching strategy, unless all Positions meet their exit and all are parked into cash/cash-equivalent).

Now, if you choose “Continuously Switch Positions”, only Positions that triggered the Sell Filter will be replaced with the new Positions; there's no such thing as a switch-day. It allows you to ride a Position all the way through until the condition to exit is met. It is especially useful if you want to capitalize on short-term price fluctuations (thus a more frequent trading), or, if you firmly believe in a Position's setup for entry and exit (hence riding it through no matter what).
If a potentially-profitable new Position is found, PB will recommend you to enter that Position. If no profitable replacement is found, PB will recommend you to buy into the cash-equivalent.
Once a cash-equivalent Position is entered, PB continuously looks whether there is a more profitable position than the cash-equivalent (based on the Buy Filters and Ranking Rules). If that's found, the cash-equivalent will be sold, and you'll buy the new Position. Such potentially-profitable instruments can be found on the Trade Signals Tab as shown below:

Regardless of Periodic or Continually Switching strategies, it is highly recommended that you use a Margin Account at your broker, instead of the Cash Account. This is because a trade's liquidated-fund requires a Settlement Date (usually 2 days after the trade is executed). You can use unsettled funds to enter new Positions, but these Positions can't be liquidated before the said funds are settled. Since Portfolio Boss's Positions may be switched in quick successions, you may commit Good Faith Violation (or Free Riding Violation) unknowingly.
A Margin Account solves that problem as you can enter and exit Positions freely without waiting for the funds to settle (by borrowing from your broker). If you must use a Cash Account for whatever reason, set aside some part of your fund (as reserve cash, instead of trading all your cash) to enter and exit Positions recommended by PB while waiting for the previous funds to settle.
Note:
A continuously-switching strategy requires that you have at least one Sell Filter. Otherwise there's a red warning and you can't backtest the strategy:

2. Total Positions to Hold: this rule defines the number of Positions the strategy holds at any given time.

You set this number based on your account size, risk tolerance, and the Portfolios you're trading. Smaller accounts need only to hold 3 to 6 Positions at any given time. Increasing this number also lets you diversify, thus potentially reducing risk (drawdowns), at the expense of potentially lower returns, and vice versa.
This value also defines the top n instruments ranked by the Ranking Rules. For example, a value of 5 here means the strategy will enter instruments that passed the Buy Filters and ranked in the top 5, based on the Ranking Rules. Thus increasing the total Positions may expose you to trade lower-ranked instruments.

This value can not be more than the distinct number of instruments in the strategy's Portfolios.

For example you use two Portfolios totaling 10 instruments, of which 2 instruments are also found in the other Portfolio, then you can only input a value of 8 here, nothing more, but could be less. Otherwise, a warning will appear and you can't backtest the strategy. The maximum number of Position you can hold is 1,000.
Your account size will be divided into this number of Positions. For example, you're putting $100,000 into this strategy and you set this rule to 10 Positions. Then each Position initially will have $10,000 to buy its shares; it may then gain or lose. If it's replaced by another Position (due to hitting a Sell Filter), the new Position will worth about the same as the latest value. At the switch date, the total worth of all Positions will be divided evenly among the 10 new Positions.
3. Position Type: this rule defines the type of Positions generated by the strategy, either long Positions, or short Positions. Note, this rule may not be available depending on your license, so you'll be using long Positions by default.

“Long” is the normal position type, in which you actually buy instruments to enter the Positions (preferably at a low price), and sell them to exit the Positions (preferably at a higher price). “Short” is the exact opposite, where you sell (“sell short”) instruments to enter the Positions, and then you buy back (a.k.a. “cover”) those instruments to exit the Positions.


To short means to borrow stocks from your broker, and sell them at a price that you deem high enough. Now since you borrow the stocks, you must return them. So you buy back these stocks at a price lower than your selling price. In essence, you'll profit when the price falls, so you pocket the price difference between selling and buying back.
This “Short” mode changes the way the rules behave, so we'll cover it extensively in a later page.
4. Monthly Switch on Open of: this rule is only available if the previous “System” rule is set to “Periodically Switch Positions”. It defines the switch-day for all your Positions. You can set whatever date you want here.

One day before the switch-date, PB generates trading signals (on the Trade Signals Tab) to sell old Positions and buy new ones. Then at the switch-day, within 30 minutes of the opening bell the old Positions will be closed (as the name implies, “…on Open of”) with Market Orders, even if you have Limit Sell Order set for this strategy. The replacement Positions will also be entered during such time, unless you use Limit Buy Order.

Note, the switch-date is the trading date of the month, not the actual (calendar) day of the month. For example, a value of “6th” here means the 6th day that the market is open since the beginning of the month, i.e. excluding holidays and weekends.

The negative dates here represent the “nth trading day before the next month begins”. For example, a value of -1 means the last trading day of the month; and a value of -3 means the third trading day before the next month begins, etc.

Changing the switch-date may affect the performance of your strategy, as each phase of the month has its own trading characteristics (more volatile, or trading more volume, etc.).
5. Don't Switch if Position is Still in Top: this rule is only available if you use a periodically-switching strategy. It allows you to keep existing Positions if they still rank highly.

So at the switch-day, if an existing Position passed the Buy Filters and ranks within the top n% as defined in this rule (based on the Ranking Rules, in relation to all instruments that also passed the Buy Filters), that Position will be kept, instead of being replaced with a new position. This is true even if there are other instruments that rank higher.
The idea is that, as long as existing Positions are still potentially profitable (in the general top n% as you defined), you keep riding them out, instead of switching in and out incurring commission fees and slippage. Besides, these existing Positions have shown their colors and performed well; who knows what the replacements will do.
Notes:
- This rule is not meant to exit Positions outside the top n%. We already have Sell Filters to exit Positions. Those instruments outside the top n% may still be included in the next Positions, especially if the top n% can not fill the Total Positions to Hold.
- Try a narrow percentage, such as 3%, 5%, or 10%, as you don't want to keep existing Positions that don't rank highly.
6. If Position Triggers Sell Filter, Replace with: This rule is only available if the strategy is set to “Periodically Switch Positions”. There's a counterpart for a continually-switching strategy, explained later.

This defines whether closed Positions (when triggering Sell Filter) are replaced with “Cash” (the liquidated fund sits idle), or “Cash Equivalent” so you may still profit (no matter how little) while waiting for that new Position to enter.

Usually you want to park the money in an instrument more stable than stocks, e.g. government bonds. To define such cash-equivalent instrument, go to the rule just below this (explained later). But “hard cash” can be useful if the market condition is so bad, that you must get out of all trading and investment activities, even in safe government bonds. Besides, some brokers pay interests on your idle cash (not to mention with a cash-based strategy, you don't have to pay those extra commission fees when entering & exiting the cash-equivalent Positions).
Do understand that once a Position hits a Sell Filter, PB not only generates a Sell Signal for that position, but a Buy Signal as well for the cash-equivalent (for cash, it's simply an “enter” signal).

Note that some licenses do not allow you to choose the “Cash” option, therefore you're locked to use the “Cash Equivalent” only. If you wish to upgrade your license, please contact our Customer Support team.
7. If Position Triggers Sell Filter, It Will be Replaced with the Next Top Position. If There's no Next Top Position, Replace with: this rule is similar to the previous one, except this is for a strategy that's set to “Continuously Switch Positions”.

Most of the time, a continuously-switching strategy immediately enters a new Position to replace the one exited. But if such replacement can't be found (e.g. no instruments passed the Buy Filters), it will enter the cash or cash-equivalent Position, depending on the option you set here. The “Cash” option can be useful if your strategy does frequent, short-term trading.
If you choose cash-equivalent, the instrument can be defined on the “Cash Equivalent” rule, explained next.
8. Cash Equivalent: here's where you define the cash-equivalent instrument. This rule applies to both a periodically-switching strategy and the continuously-switching strategy.

Let's say you want to park the liquidated fund into an ETF that tracks US government's treasury bonds, then type SHY here (and press enter). You can also type anything related to the instrument you're looking for, for example “treasury” or “bond”. Then choose (click) from the dropdown that appears. To view the price chart for that instrument, click the “chart” button  next to it.
As a side note, the strategy's backtest period may be stretched backward with an older cash-equivalent, like PTSHX. That way, the backtest becomes more accurate as it spans a longer period (make sure the strategy's Portfolios are also old enough). Once the strategy is ready to be deployed, type here a commonly traded cash-equivalent like SHY (though it may shrink the strategy's total return a little), as PTSHX can only be traded by institutional investors. You may check if your 401(k) has PTSHX as an option.
Keep in mind, this rule can be used to initiate bearish cash-equivalent Positions. That is, once the old Positions are liquidated, you buy an inverse ETF, instead of going long bonds ETF. That way, during market breakdowns your gain will shoot up high instead of going sideways. Simply type the inverse ETF symbol here:

For example your Portfolio consists of S&P 500 stocks, you can use SH (the exact opposite of S&P 500) as the cash-equivalent. But beware as shorting is a dangerous and (often) losing game. It's advisable to do this trick only if the strategy closes its Positions due to general market breakdown.
Now, you can also initiate bearish cash-equivalent Positions by literally shorting the cash-equivalent instrument. You do that with the rule just below this one, i.e. “Cash Equivalent Position Type”, discussed next.
Notes:
- Cash-equivalent Positions are always entered and closed with market orders, even if your strategy utilizes Limit Orders. The idea is that you want to park your money immediately once the old Positions are liquidated, and to get out of that safe haven immediately once profitable instruments are found.
- You can't enter a delisted instrument here (those indicated by a number suffix inside square brackets). Otherwise a warning appears and you can't backtest the strategy:

9. Cash Equivalent Position Type: this rule defines whether you're buying the cash-equivalent instrument, or you're literally shorting them.

If you just want to be safe, by buying bonds/government treasuries ETF, then make sure this is set to “Long”. Even if you're using an inverse ETF as the cash-equivalent, you must set this to “Long” because essentially you're going long (buying) that bearish instrument.
Now, there are cases where you need to actually short the cash-equivalent instrument. For example if there's not a single ETF representing the inverse of your Portfolio. In that case, you can set this rule to “Short”, while the cash-equivalent instrument is set to a bullish ETF representing your Portfolio.

The short cash-equivalent Positions behave the same way as the long ones, except when entering and exiting them you'll receive Short and Cover Signals, respectively (as shown on the Trade Signals Tab):


But most of the time you can find such inverse ETFs. In that case it's much better to just go long/buy any of those ETFs (you won't be hit with margin and stock-loan fees like when you go short). Now, the common way to use the “Short” option is when you trade single stocks (the strategy's Portfolio contains but a single stock), because individual stocks don't have the inverse counterpart:

In the example above, when TSLA long Position will be closed, you may get two signals: One to sell it, the other to sell-short (initiate the TSLA short Position). Ditto if TSLA long will be entered again: one Cover Signal to exit the TSLA short Position, and another a Buy Signal to enter TSLA long Position. So the two trades will happen on the same day (usually at the market open).

This is true unless the strategy entirely uses Limit Orders, in which case, Cash Positions may become the intermediary between the long and the short Positions.
When looking at the Positions Tab, it may not be readily known whether the Position is the normal one (long), or the cash-equivalent (short). You can hover your mouse over the symbol to see its Position type:
The section “Positions sold at the open” may also display covered (not sold) cash-equivalent Position.
Now, you can create many of these single-stock strategies (even better with the help of the Divine Engine), then you combine them with a multi-strategy (or meta-strategy). That way, despite high volatility (but also high gain), you may smooth out the ride altogether.
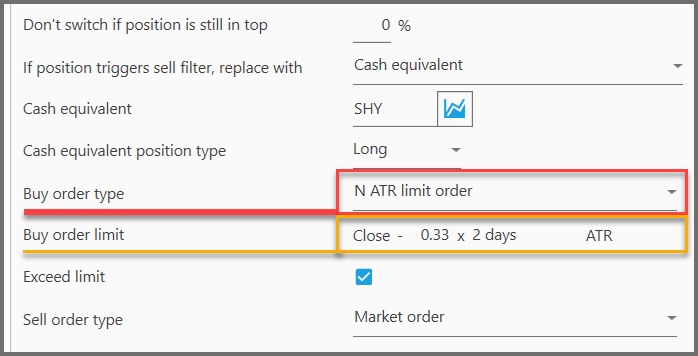
10. Buy Order Type: this rule lets you choose between using Market Order or Limit Order when entering Positions. Note, some licenses don't have the ability to use Limit Orders. Please contact our Customer Support to upgrade your license.

There are three options for this rule, one is for a Market Order, and the other two are different flavors of the Limit Order (we'll discuss them in detail in the next section):
- Market Order: it's the default order type. PB generates the Buy Signals, and then such signals are input by you to the broker (as orders). The broker in turn, will buy the instruments based on whatever market price when they execute the orders (usually during the market open).
- N ATR Limit Order: instruments are bought with Limit Orders (limit prices) that are calculated based on their ATR (Average True Range).
- Percentage Limit Order: instruments are bought with Limit Orders based on a percentage of the previous day's closing price.
Any Limit Order requires the broker to wait until a certain price (or lower) is met for the Buy Order to be executed. This “limit price” will be calculated using the rule below, called “Buy Order Limit” (only visible if you choose anything other than “Market Order” here):
When setting up your Buy Order Limit, you'll also see an ‘Exceed Limit' checkbox. This option controls whether the day's low price must be strictly lower than your limit price for Portfolio Boss to consider it a buy. When checked, this feature helps account for potential gaps between the low price and the ask price, particularly important for low-priced stocks and ETFs under $10 where order fulfillment can be more challenging.
For example, if you set a limit price of $7.00 and the ‘Exceed Limit' option is checked, the day's low must fall below $7.00 for PB to consider the order filled. Perhaps 10,000 shares are sitting at that price. Unfortunately, only a couple orders get filled, and yours wasn't one of them and price moves back down. The strategy will think you bought unless you check that box. This is especially useful when building trading strategies for correct modeling.
So it goes like this: You set the limit price calculation with that “Buy Order Limit”. Then the strategy generates Buy Signals as usual. These signals, along with the limit prices (calculated by the strategy based on your setting), are sent to your broker. Such limit prices are shown in dollar value, that is, “buy the instrument at this price or lower“. Each buy signal (each instrument) will have its own limit price.

Once the market closes at the next trading day (the day after the Buy Signals were given), PB looks for the day's lowest prices (for each instrument to be bought) to decide whether or not the limit prices are met. If they're met (and exceeded if that option is selected), then PB considers those Positions as already entered. Once entered, PB can only assume their entry price, that is: whichever is the lower price between the opening price, and the limit price itself. In reality, the entry price could be different than either of them, i.e. due to slippage, or some advanced order-algorithm used by your broker.
If some instruments don't meet the limit price, then PB assumes they are not entered as Positions today, thus they're listed as Cash Positions until the next Buy Signals are given (could be for different instruments).

Limit Order is good for two things: to look for discounts when entering a position, and, to minimize slippage (difference in price between order entry and execution) which may seem small but will accumulate for all your trades, eating your account.
A Limit Order in PB only lasts for that single day; if you don't get the right price for the day, the order must be cancelled (because PB may generate other signal for a different instrument and/or different limit price). Obviously, PB can only “assume” whether or not the Limit Order is filled; you may want to check with your broker to see if it's actually filled.
11. Buy Order Limit: this rule calculates the limit price that you'll send to your broker. It's only available if you set the previous rule into any of the Limit Orders there. Each type of Limit Order has its own way of calculating the limit price:


- N ATR Limit Order:
Essentially you'll buy the instrument if the price is lower than the previous day's close. But how low? Enter the Average True Range. ATR measures an instrument's volatility (in dollar value) during a certain period. In other words, how much a stock goes up or down on average during the past certain days.
If a stock goes below the previous day's closing price, and such drop exceeds the ATR (but not too much), then the stock is likely to rebound to the general trend. So, not only you enter the position at a big discount, you're also well placed for profit when the price rebounds.
Of course you can be on the conservative side as well, for example you'll buy if the drop is just a fraction of the ATR. You may only get a small discount when entering the position, but at least you don't risk the instrument reversing its trend. Besides, such Limit Order is more likely to get filled since it has a shallower entry price. Either way, Limit Order allows you to get an extra discount, and the ATR gives you an idea of how likely the Limit Order will be filled (anything too much beyond that ATR and the order may never get filled).
The formula is pretty self-explanatory: “Buy the instrument if the price is equal to or lower than: the previous day's adjusted closing-price minus the multiplied ATR of the past certain days.”

The first parameter defines the ATR multiplier. Values greater than 1 mean you're looking at a price-drop greater than the ATR. Fractional values (like 0.33) mean you're looking at a price drop smaller than the ATR (i.e. one-third):

The second parameter defines the period for the Average True Range. That is, the number of days for the price-volatility to be calculated. The usual periods are 2, 10, 14, or 20 days:

On the Instrument Tab, an indicator-line (showing the limit prices) is overlaid on the price chart:

Look at a Buy candle whose low of the day is lower than (or equal to) this indicator line; it means the Buy Limit Order was filled on that day.
- Percentage Limit Order:
This is the simpler Limit Order type: instead of using price volatility in the past few days, the limit price is simply calculated a certain percentage below yesterday's adjusted closing price.
![]()
There are two reasons for this: First, yesterday's closing price usually continues right to the next market open (at least not too far off, since gaps aren't that common), so your order is more likely to get filled, unless you use a big percentage here. Second, stock prices usually reverse a little (from yesterday's closing price) at the opening hour, before resuming the general trend; hence you could get a small discount before the price rallies to your profit later in the day.
The calculation is: multiply yesterday's closing price (adjusted) by the percentage you set here, then subtract the resulting dollar from yesterday's closing price. There is your limit price for today.
There's only one parameter for it:
![]()
That defines the percentage below yesterday's close. You don't want to set this at high values, because then all your limit orders won't get filled. Our experiments showed that values between 2.5% and 7% are generally the sweet spot. The maximum value you can set here is 50% while the minimum is -50% (yes, you can put a negative percentage, which means the Buy Limit Price is higher than yesterday's closing price).
On the Instrument Tab, an indicator-line for this Percentage Limit Order is overlaid on the price chart:

Look for a Buy candle whose low of the day is lower than (or equal to) this blue line; it means the Buy Limit Order was filled on that day.
Note:
Obviously, “yesterday's closing price” is from the day the Limit Buy Signal is given.

12. Sell Order Type: this rule lets you exit Positions with either Market Order or Limit Order. Note that some licenses can't use Limit Orders (thus defaulting to Market Order); please contact our Customer Support if you wish to upgrade your license.

There are three types of order you can choose here:
- Market Order: The Sell Signals don't carry limit prices, i.e. you take the Sell Orders to your broker, and they'll execute them based on whatever market prices they're trading at (usually at the market open). Generally, Market Order is best, because you don't want any obstacles when exiting Positions; otherwise you're in for greater losses while waiting for those limit prices.
- N ATR Limit Order: You sell the Positions with Limit Orders calculated based on their Average True Range.
- Percentage Limit Order: The Positions are sold with Limit Orders calculated as an offset from the previous day's closing price.
Limit Sell Orders can be useful not as a stop-loss, but as a way to squeeze that last drop of profit when you sell the Positions. Once you choose any of the Limit Order-types here, another rule appears below this, i.e. “Sell Order Limit”, which defines how the limit prices are calculated.

Limit Sell Order is only applicable for Positions that hit Sell Filters specifically set to use Limit Order (explained later). Positions that hit such Sell Filters will be sold with Limit Orders, stated in dollar value, i.e. sell at this price or higher. Sell Filters that are set to Market Order don't trigger the use of Limit Order, ditto Positions that will be sold due to switch-day won't use Limit Order.

So, once the Sell Signals and the limit prices are sent to your broker, at the end of the next day PB looks at the High prices of the day (for all Positions that hit Limit Sell Filters). If such High prices are equal or greater than the limit prices, then PB assumes the Positions exited. These Positions are then replaced with Cash Positions on that day; and you'll receive Buy Signals to be executed the next day (either for entering cash-equivalent or new replacement Positions).


If they fail to get sold, these Positions remain, and the strategy tries to sell them every single day (with the latest limit prices) provided they still hit the Limit Sell Filters.
Now, as stated before, some Sell Filters must be specifically set to use Limit Order. You can do this by going to the Sell Filters Panel, and set at least one of the filters to “Limit Order” instead of “Market Order”. If no Sell Filter is set to use Limit Order, the “Sell Order Type” rule shows a warning and you can't backtest the strategy:

If such Sell Filter triggers a Sell Signal, the Limit Order will be set in place. But if it's triggered by a Sell Filter with a “Market Order”, obviously no Limit Order will be set in place.
It's good to set at least one Sell Filter to “Market Order”, so even if the Limit Order doesn't get executed, you may exit out of that Position with the Market Order (if the price continues to deteriorate).
13. Sell Order Limit: this rule is only available if you set the previous rule to any of the Limit Order-types. This rule lets you define the way the sell limit price is calculated. Each Limit Order-type has its own way of calculating the limit price.


- N ATR Limit Order:
In essence, you'll only sell if the price is equal or higher than: the previous day's adjusted closing-price plus the multiplied-ATR of the past certain days.
The first parameter defines the ATR multiplier. You can set it higher than 1 if you're looking for a greater profit. Or be conservative and set it less than 1 so your order is likely to be filled (since the average price range is not exceeded).

Keep in mind, you may set this multiplier to a negative value, which means the limit price is below the previous day's close and higher. This can be useful to lower the selling barrier so your Sell Limit Order is more likely to get filled. If such is the case, set this multiplier to a negative fractional value (for example, -0.33).

The second parameter defines the number of days to calculate the Average True Range (which includes today, when the limit signals are given):

On the Instrument Tab, you'll see the Sell Limit indicator (blue line) overlaid on the price chart:

Look for a Sell candle whose High is higher than (or equal to) this indicator line, it means the Sell Limit Order was filled on that day.
- Percentage Limit Order:
The sell limit price for this is calculated as a percentage above yesterday's closing price (adjusted).

So yesterday's closing price is multiplied by a certain percentage, and the resulting dollar value is then added to yesterday's closing price.
There's only one parameter here, which defines the percentage:
![]()
You can put a negative value here so the sell limit price is actually lower than the previous close, but if there's a better (higher) price than it will be used instead. This way, your Limit Sell Order is more likely to get filled.
Now, on the Instrument Tab, an indicator-line representing this percentage limit price is overlaid on the price chart:

Look for a Sell candle whose high of the day is higher than (or equal to) this blue line; it means the sell limit price was reached on that day (order filled).
14. Add Option: located at the top-right corner of this System Settings Panel, this button allows you to add a Slippage rule to your strategy.

Click the button, and a dialog shows up so you can select and add the additional rule:

Once added, it's listed at the bottom of this panel:

So a word about slippage: when a broker executes your order, the fill price may actually be different than the price when you entered the order. This is due to micro-second volatility of the market.
In PB, unless you're using Limit Orders, most positions are entered and exited at market open (the most liquid, but also the most volatile). So slippage denotes execution price different from the day's opening price. This rule simulates the slippage that'll happen on your trades (Buy, Sell, Cover, and Short), including trades for the cash-equivalent Positions. If you're buying, slippage causes your entry price to be higher (more expensive) than the opening price; and if you're selling, it causes your exit price to be lower than the opening price (less realized profit), etc.
Slippage is calculated as a percentage of the stock's price-range for the day it's traded. For example, a stock moves $10 between the high and low prices of the day (adjusted), then a slippage of 5% will get you an entry price $0.5 more expensive than the market's opening price. The strategy's metrics reflect a reduced gain due to slippage. This allows you to have a more realistic return on your strategy.

Keep in mind, if you have a larger account, you want to simulate a slippage of about 10% on all your trades. Otherwise, a value of 5% or lower is about right. That's because larger accounts tend to trade larger volumes of shares, hence orders may take a while to be entirely filled, so slippage would be more obvious. Not to mention you may offset the price balance with your large orders (the law of supply and demand).
You can disable this option by unchecking it (disable its checkbox on the left), or simply delete it by clicking the trash-bin icon on the right.
Notes:
- As stated earlier, slippage normally isn't applied to Limit Orders. But if your Limit Orders are executed with the opening price (because the opening prices are better than the limit prices), then slippage will be applied for those trades.
- Even if the candle doesn't show a price higher than the opening price, slippage will still be applied when you're buying. And vice versa when you're selling: even if there's no price lower than the opening price, slippage will cause your exit price to be actually lower than the opening price. It's just a simulation after all; you may want to check your brokerage report for the actual slippage (and other fees like commissions, margins, stock-loan fee, etc.).
Discount Applied Successfully!
Your savings have been added to the cart.
Report
Block Member?
Please confirm you want to block this member.
You will no longer be able to:
- See blocked member's posts
- Mention this member in posts
- Invite this member to groups
- Message this member
- Add this member as a connection
Please note: This action will also remove this member from your connections and send a report to the site admin. Please allow a few minutes for this process to complete.
Report