Multi-Strategy

In Portfolio Boss, you can combine two or more strategies into a hierarchy contained within a Multi-Strategy. In essence, you're stacking the strategies top-to-bottom. So, if the top strategy is on a sell signal, instead of parking that money into the Cash Equivalent, Portfolio Boss will operate the next strategy. If this child strategy also fails, then Portfolio Boss will go into the subsequent grandchild strategy, and so on and so forth.

The idea is that the top-most strategy is the riskiest investment (but also the most profitable), and if the market conditions don't favor risky investments, we go to the strategy with lesser risk. But if conditions are so bad that all strategies sell their Positions, then get out of all investments and park our money in cash only. So we limit risks based on market conditions, without sacrificing big profits. You will be consistently profitable; even at worst, you'll avoid that big and deep crash.
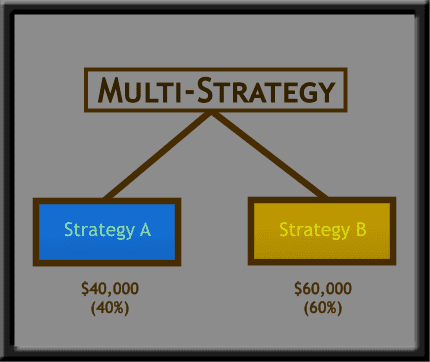
You can also combine strategies without a hierarchy between them. It's like using each strategy separately, but now you don't need to backtest them one by one. Portfolio Boss divides your total account size between the strategies, based on their “Weight” percentage:
This is great for those with enormous account: It's well known that hedge funds performance would revert to the mean (or even negative) if their assets grow too big. So you diversify into different strategies with different asset-classes. Even better, these separate strategies can have their own child strategies as well. So you're combining multiple strategy-stacks:
Note that some licenses don't have the ability to create Multi-Strategies. If you wish to upgrade your license, please contact our Customer Support team at support@portfolioboss.com.
Create a Multi-Strategy from Scratch
Obviously, you need to create the individual strategies first, which will be combined in a Multi-Strategy. The most common way is to create them with tiered-risk management in mind, as described above. You may also create one Long Strategy and one Short Strategy: so instead of going flat (or shallow dip) during market break down, your account may shoot up high. Make sure these strategies are performing well before you combine them into a single Multi-Strategy.
In our case, we have created three strategies based on tiered-risk management:

- Allstock Strategy is the first tier, the bread and butter strategy, that trades the Nasdaq 100 Portfolio (high return, but high risk).
- Dividend Strategy is the second tier, and it trades stocks with the juiciest dividends. You'll get paid regularly even when the bears come out.
- Treasury and Bond Strategy is the last tier. It trades corporate and government bonds as a last line of defense, being one of the most stable asset classes during black swan events. Not only they're stable, they also pay excellent interests regularly when the Fed decides to wreak havoc on the stock market. This last strategy is best to use Cash (instead of Cash Equivalent), so when all asset classes fail miserably, you revert to cold, hard, idle cash (which may still get you interest payment, depending on your broker).
It's recommended that you name these strategies (from top tier to the bottom) in alphabetical order, so you can easily see their hierarchy later on.
Now, to create the Multi-Strategy, go to the Strategy Management page and click the “New” button. From the dropdown, choose “Strategy”.

A dialog box appears where you can give it a name, and select the group to put it. Here, you must set the “Strategy Type” to “Multi-Strategy”. Then press OK.

You'll then be brought to the Backtest Strategy page where you can customize the new Multi-Strategy.
Note, the “Backtest Strategy” page is slightly different for a Multi-Strategy. The Rules Area won't contain filters and rules, but a list of strategies instead. And there's neither the History Tab nor the Top Ranking Instruments section (on the Trade Signals Tab).
Adding the Various Strategies
Now to add the strategies, click the “Add Strategy” button on the Strategies Panel:

A dialog box appears to let you search and add the strategies. Note that you can only add Basic Strategies here (either built-in with your license or those you created).

Once the strategies are selected (ticked), press OK and you'll see those strategies listed alphabetically on the Strategies Panel:

To remove one strategy from the list, click its trash bin button; to delete all strategies at once, click the top-most trash bin button.
Editing Each Listed Strategy
You can edit any of those strategies by clicking the strategy's name (highlighted blue):

The “Edit Strategy” dialog appears, representing the Rules Area for that strategy. Here you can change the strategy's rules (and Portfolios), just like when you open the strategy on its own.

Keep in mind, this is editing the actual strategy, so to prevent unwanted changes it's set to read-only mode (you can't edit anything). You must click the button “Override read-only mode” to edit the strategy. A dialog shows up to confirm the override; simply click “I understand”.

It's better that you only make light changes from the “Edit Strategy” dialog, as you can't backtest the strategy from here. To make big changes and see the resulting performance, better do it from its own Backtest Strategy Page.
Now, in regard to the hierarchy, the most important change we do here is the Cash Equivalent rules. You want to make sure all strategies (except the lowest tier strategy) use Cash Equivalent instead of Cash. And choose whatever instrument as Cash Equivalent (e.g. SHY, PTSHX, or even inverse/bearish ETF).

That way, the strategies are allowed to have a child strategy. The lowest tier strategy (which won't have a child) is set to use Cash, so when all strategies & assets fail, we revert to the final safety of the dollar. Once done with the editing, click the “Close” button (no need to click “Restore read-only mode” as it's automatically done when you close the dialog).
Next we'll discuss how to actually create the hierarchy.
Creating a Hierarchy between the Strategies
Going back to the Strategies Panel, you see that each strategy has a checkbox. If you want a strategy to have a child, tick the checkbox. And then choose the child strategy from the dropdown menu:

In our case, the Allstock Strategy will have the Dividend Strategy as its child.
This Dividend Strategy, in turn, will have the Treasury & Bond Strategy as its child (which will be a grand-child strategy overall). So do the same thing: tick the Dividend Strategy's checkbox and select its child from the dropdown.

The Treasury & Bond Strategy, being the last tier and thus no child, does not have a checkbox, as it uses Cash instead of Cash Equivalent.

As a side note, if you want a strategy to have a child but there's a warning “No assignable strategies left”, it means all the listed strategies have been put in the hierarchy; simply add more strategies to the list:

Lastly, for this hierarchy to work properly, make sure the first tier strategy (the ultimate parent) has its actual “Weight” set to 100%. You can put any number here so long as the percentage inside the parentheses reads 100%.

That means, you're putting 100% of your account size into the ultimate parent. That fund will then trickle down to the child and grand-child strategies, depending on the market conditions.
Thus, you've created a strategy stack. From the first tier to the last (top to bottom), the strategies are listed alphabetically, so you don't get confused. You can now backtest the strategy to see how it performs. If you wish to use it, enable its email notifications:

When you press the “Start” button, a Multi-Strategy doesn't show a confirmation dialog, unlike other types of strategy where you can write a memo.
Keep in mind, since we'll be backtesting many strategies, it may take longer than usual.
Seeing the Strategy Stack in Action
This section might be a little complex. But in reality, once the Multi-Strategy is put to use, such complex mechanism is taken care of by Portfolio Boss. All you need to do is fire up the Trade Plan Calculator whenever trading signals are given, and input the order information to your broker. If you're curious how a stack of strategies works, read on.
Behind the scene, each strategy runs independently, regardless of the hierarchy. So each strategy has the usual Buy and Sell Signals, and its current Positions held. Let's say we put $100,000 into the Multi-Strategy; this amount will be assigned initially to the Allstock Strategy:

If we look at the Positions Tab, the Multi-Strategy fully utilizes the 1st tier strategy (Allstock) and none of the child strategy. All its 10 Positions are still in stocks:

With the Allstock Strategy's “Current weight” of 100% (as shown above), the whole $100,000 are currently used by it. Its Positions are given different amounts, based on their weights (due to their gains & losses).
Now, if we look at the Trade Signals Tab, one Position of the Allstock Strategy (ADTN) will be sold the next day:

Normally, if a Position is sold, it will be replaced by the Cash Equivalent (SHY). But as you see above, instead of a Buy Signal for the SHY, there are signals to buy all the child's Positions (Dividend Strategy). In other words, every sold Position of the parent (which is supposed to go to Cash Equivalent), will be replaced by the whole child strategy. Remember that each strategy runs independently, therefore the child strategy has its own existing Positions.
The weight of the sold Position will be divided equally among the child's Positions. In this case, the ADTN weight of 9% ($9,000) will be divided by the child's 10 Positions, so each will have 0.9% ($900).

So let's open the Trade Plan Calculator, so these trades will be executed tomorrow. We enter $100,000 into this calculator, click the button “Update Suggested Quantities” (or press enter), and don't forget to tick the checkbox “Check this if this is the first time you're entering this strategy”:

Essentially we'll be buying 9 stock Positions for the Allstock Strategy (worth about $91,000) because this is the first time we're using the Multi-Strategy. We'll also buy 10 stock Positions of the Dividend Strategy (all worth about $9,000). We'll input all this information to the broker. Note the dollar amount for each Position (orange rectangle above), especially for the child: it's not exactly $900 per Position. This is due to the price-per-share causing imperfect division.
At the next day, if we take a look at the Positions Tab, there are two groups of strategy listed here:

One group is for the Allstock Strategy (9 Positions), and the other group for the Dividend Strategy (10 Positions). Note the current weight for the Allstock Strategy is now at 90.6%, whereas the Dividend Strategy is at 9.4% instead of 9%. This is due to the gain/loss that some Positions went through today. Also take note of the green arrow, which shows the Allstock Strategy's Position sold at today's market open.
There are no trade signals for the next market open, so if you look at the Trade Signals Tab there's only a note to hold the current Positions (19 symbols; 9 from Allstock Strategy, 10 from Dividend Strategy):

Come the next trading day, the strategy has gained about 4.1%, so our account size is about $104,100 now. This is just an approximation, calculated from the difference between the Multi-Strategy's total return today versus the day we entered the strategy (which can be seen from the Chart Tab). You may need to check your brokerage account for the exact account size.
If we look at the Positions Tab, the weights for all Positions have also changed, reflecting the dollar amount each holds in relation to the current account size (due to gain/loss):

The Trade Signals Tab also shows some signals for tomorrow: the Dividend Strategy will sell one of its Positions (DHI), with a weight of 1% ($1,041):

As stated earlier, each sold Position of the parent will be replaced by the whole child strategy. In this case, the Dividend Strategy has the Treasury & Bond Strategy as its child. Therefore we also have the signals to buy all 10 Positions of the Treasury & Bond Strategy, each with a weight of 0.1% ($104).

So let's open the Trade Plan Calculator and enter our current account size ($104,100). This time we shouldn't tick the checkbox at the bottom, since this is our second trade with this Multi-Strategy.

As usual, each new Position isn't exactly worth $104 as per our theoretical calculation (due to price per share causing imperfect division). As a side note, the dollar amount distributed to the child doesn't come from the sold Position's actual dollar amount (in this case $979.03), but from the theoretical amount (1% of $104,100, i.e. $1,041).
At the next day, we see the Positions Tab is fully populated with the three strategies:

We see the Dividend Strategy's weight decreased from 9.5% to 8.4% due to the DHI sale (sold at the market open), hence 1% went to the Treasury & Bond Strategy. The weight change is also due to the overall gain/loss that all strategies went through today. Our account size now sits at $107,430 (3.2% gain eyeballed from the Chart Tab).
If we see the Trade Signals Tab, we'll sell all the remaining Allstock Strategy tomorrow (apparently there's a market break down of some sort).

The Allstock Strategy's weight is currently at 90.6% (out of $107,430), or about $97,331. This will be used to buy all 10 of the Dividend Strategy's Positions (including the 1 Position that represents the Treasury & Bond Strategy). So the new Positions for the Dividend Strategy will be worth 9.1% each (rounded up from 9.06%). And the new Positions for the Treasury & Bond Strategy will be worth 0.9% each (rounded from 0.906%).

So let's open the Trade Plan Calculator and input $107,430 there:

You'll notice that the Buy orders have a percentage-suffix on them (inside the parentheses). It indicates the percent-increase from the existing Position. For example the Position WSM (Dividend Strategy) currently sits at $977 (0.9%), and we'll be buying $9,733 more (9.1%), which is an increase of 996.21% from the current WSM Position. Note that some Buy orders are split (e.g. HYLD), because they exceed the average volume per minute (the percent-suffixes will add up to the total increase).
At the next day, we see the Positions Tab, and none of the Allstock Strategy is present. The Multi-Strategy now fully utilizes the child and grandchild strategies. There's a section showing the Allstock's Positions that were sold at the market open today:

But the most interesting are the new Positions, highlighted by the red rectangles. They're separated from the old Positions (those not highlighted), despite comprising the exact same symbols. Because, as you see on the blue rectangles, their dollar amounts (weights) are different from the old Positions, not to mention their holding duration is different too (thus different total gain/loss). So they're technically different Positions from the old ones.
You may also notice the “(9)” suffix on those new Positions. It simply shows the multiplier for that Position. As you remember, each sold Position from the parent equals one child strategy. We recently sold 9 Allstock Positions, so we have 9 times the Dividend Strategy, which translates to 9 times of its Positions.

Ditto Treasury & Bond Strategy's new Positions have the “(9)” suffix, because: despite its parent (Dividend Strategy) only selling 1 Position, there are actually 9 Dividend Strategies activated (due to Allstock's 9 Positions sold), thus there are actually 9 Positions sold from the Dividend Strategy, which translates to 9 times the Treasury & Bond Strategy. It sounds complicated but really it's not that important; what counts is the weight of each Position.
Now, fast forward a couple of days later, we have signals to sell all the remaining Dividend Strategy's Positions:

We suffered some losses the past couple of days, so our account size is now at $106,860. All the Dividend Strategy is worth 89.9% (about $96,120) and this will be divided evenly to all 10 Positions of the Treasury & Bond Strategy (thus 9% for each new Position, or about $9,612).

As usual, we'll open the Trade Plan Calculator and input our account size of $106,860. And send the information to the broker.
Come the next trading day, the Positions Tab shows the Treasury & Bond Strategy is fully utilized (100% weight). All 20 Positions of the Dividend Strategy were sold at today's market open.

And we have 10 new Positions under the Treasury & Bond Strategy (red rectangles), each with a suffix “(90)”. It means that each new Position is multiplied by 90, since there are 90 Treasury & Bond Strategies activated based on the recent sale.

For the next few days, the Multi-Strategy fully operates with Treasury & Bond's Positions. Eventually, these bonds too will be sold, so the Multi-Strategy will hide 100% behind the safety of the dollar.

Notice when a symbol will be sold, the trade signal doesn't discriminate between the different Positions of that symbol. For example the symbol ICVT is represented by three Positions: ICVT (90), ICVT (9), and ICVT, which will be sold all at once. All three are added together into a total weight of 9.8%.
Our trading account now sits at $106,851, and all this will be converted to cash at tomorrow's market open.

So we open the Trade Plan Calculator and input $106,851. All orders are simply sell orders here:

Note, when a sell order is split (due to exceeding average volume per minute), there's a percentage suffix on each split-order. For example the ticker PCEF is split into two sell orders, each with a suffix “(50.08%)” and “(49.92%)”, which add up to 100% of the PCEF sale. It's simply a split-percentage, not the percent-addition we saw earlier.
Now, our Multi-Strategy would stay in cash for the next 6 days. If we look at the Positions Tab, there is only one Cash Position, with a multiplier of 1000.

This is because there are 100 Treasury & Bond Strategies activated (10 Allstock positions sold × 10 Dividend positions sold), with each Treasury & Bond Strategy containing 10 Cash Positions.
Six days later we'll exit the Cash Position: the Allstock Strategy will enter 5 stock Positions, and coincidentally the Dividend Strategy too will enter 10 stock Positions. So the Allstock Strategy will be assigned 50% of the Cash (10% for each new Position); therefore the remaining 50% will be assigned to the Dividend Strategy (5% for each Position). It's a switch day, so the new Positions will have equal weights.

It may be a little confusing to see the Dividend Strategy divided into two groups (green areas); ditto the Treasury & Bond Strategy (red areas). But really it's just visual. The total weight for each symbol (Dividend Strategy) would still be 5%. It's still the same as when there's only one Dividend Strategy group, with each Position given a suffix “(5)” and a weight of 5%.

Our account size is now $107,300. So we open the Trade Plan Calculator and enter that amount. We have all Buy orders here, for the 15 stocks (5 for Allstock Strategy and 10 for Dividend Strategy).

At the next trading day, you see the Positions Tab too shows the Dividend Strategy divided into two groups.

Sometimes when using a Multi-Strategy you'd be shown multiple groups this way. Just think of them as one group that we've seen so far.
Thus now you understand how a stack of strategies works, in general. There are some rare scenarios not yet explored here, but as said earlier, you shouldn't concern yourself too much with the nitty gritty mechanics. What you see on the Positions Tab (or the Trade Signals Tab) may be overwhelming, but really what you should do is just open that Trade Plan Calculator and make your trades.
Notes:
- The same ticker (symbol) can be shown in separate strategy groups; but when it comes to the actual trading, Trade Plan Calculator merges them as usual.
- In a continuously-switching strategy, the sold Positions won't necessarily activate the child strategy, as by nature it will immediately replace them with new Positions (instead of parking into the Cash Equivalent). Only in rare cases will it enter the Cash Equivalent (thus activating the child strategy), e.g. when none of the instruments passed the Buy Filters.
- Behind the screen, each sold Position (Cash Equivalent) of a parent equals one child strategy. Portfolio Boss keeps track of this child strategy's weight change (due to gain/loss), so if the parent replaces the said Cash Equivalent Position (into a stock Position), the fund will be pulled from this specific child strategy belonging to that parent Position. The child strategy Positions will be sold even if they don't hit any Sell Filters.
Assigning the Minimum Capital for the Child Strategy
As you see from the examples above, the weight of a child strategy becomes quite small if the parent merely sold a few positions. Trading with such small capital on a whole Portfolio may not be desirable, as commission & slippage may offset the gain. You can avoid that by specifying the minimum number of sold positions before the child strategy is activated. For example, the child will only be activated if the parent strategy sells 5 out of the total 10 Positions (50% on Cash Equivalent).
You can set the percentage on the parameter shown below:

A value of 0% means any Cash Equivalent Position (from the parent) will immediately activate the child strategy; while a value of 100% means the parent must be entirely in Cash Equivalent Positions before the child strategy kicks in.
Let's say you set it to 50% (out of 10 Positions), then for the first 4 Positions sold, the parent strategy will buy its Cash Equivalent instrument (SHY, PTSHX, etc.):


Once the parent contains 5 sold Positions, the child strategy will be activated to replace them (the previous 4 SHY positions are sold, along with the 1 stock Position).


Subsequent sold Positions will be immediately converted to the child strategy:

But if the parent strategy drops again to 4 Cash Equivalent Positions, it's now below the 50% threshold, thus all child Positions will be sold (child strategy deactivated), and you'll buy the parent's Cash Equivalent instrument (along with the new stock Position). We use a different Multi-Strategy as an example here:


This way, at least 50% of the parent will be transferred to the child strategy, so you're trading the child with decent capital amount. You can also use this method to make sure the child is activated only if there's terrible market breakdown for the parent strategy; so you get the most out of the parent, at the expense of a slightly deeper drawdown.
Note:
The percentage will be rounded up if there's no clear division. For example you set this to 51% out of 10 Positions, then the child will only be activated if there are 6 Cash-Equivalent Positions instead of 5.
Combining Strategies without Hierarchy
As stated earlier, you can also combine two or more strategies without a hierarchy between them. Even better, each of the strategies can have its own stack (hierarchy). The key here is the top-most strategies; they are the head of the families.
Each top-most strategy must have its “Weight” parameter set greater than 0%, which defines the fund size to put into each stack.

Let's say, you have two stacks: the first is comprised of Strategy A, Strategy B, and Strategy C; the second is Strategy X, Y, and Z. The first stack is given a weight of 40%, while the second 60%. We can input anything here (e.g. 4 and 6 instead of 40 and 60), as long as the actual weight (inside the parentheses) reads 40% and 60%.
If you have $100,000 to fund this Multi-Strategy, the first stack will be given $40,000 and the second one will be given $60,000, to fund their respective top-most strategy first:

The fund will then trickle down to their respective child and grandchild strategies, as usual. Whatever happens, each stack has (about) 40% and 60% total weight. The strategies are grouped top to bottom based on their respective stack:

As already stated, the multi-strategy will try to maintain the weight of each stack as you set. So if there's a stack that exceeds its weight (let's say because it's profitable), the next time its Positions are closed, some of the profits will be set aside as “Unassigned cash” in order to trim that weight back to the one you set. This unassigned cash can then be used to fund the next Positions once there are trades (could be for the other stack), so all stacks go back to the original weight ratio you set for them. If you look at the Positions Tab, you'll see the “Unassigned cash” section if such is the case:

It may appear at the top or bottom of that tab, it doesn't matter.
Now, the Trade Signals Tab may look equally complicated for these multiple stacks, but essentially they're ordered top to bottom from parent to child, and each stack is bundled in its own group:

You can also see the limit orders and limit prices here (in the example above: “Limit Sell” orders), if any of the strategies uses Limit Orders. It looks really complex, but simply open the Trade Plan Calculator as usual to create your orders (the limit prices are also displayed there).
Note:
You can pick a strategy from the first stack, to become a child for the second stack. For example, we pick Strategy C as the child of Strategy Y. So the stack now becomes: Strategy X → Strategy Y → Strategy C. The other stack (Strategy A → Strategy B → Strategy C) still runs normally. This could be useful so you don't have to create separate strategies for the two stacks, e.g. if both stacks trade treasury & bonds as a last line of defense (as represented by Strategy C).

This Strategy C operates from the second stack, and is completely separate from the first stack.


Even if Strategy C has a child (set on the first stack), the Strategy C and its child will operate fully from the second stack, and are completely separate from the first stack's Strategy C and its child.
Notes:
- Child strategies normally have their “Weight” set to 0%. If you set it greater than 0%, the child will be divided in two: one will be used normally as part of the parent stack, the other will create a stack of its own (it becomes the topmost parent), with the Weight greater than 0% that you set for it.
- As stated earlier, a Multi-Strategy doesn't have the History Tab. But you can export an Excel file containing the trade & positions history (more in-depth than the History Tab). To do that, backtest the strategy first then press the “Export” button. A dialog appears; select the topmost option, and press “Export”.

For a more thorough explanation about multi-strategy's export results, read here.
Discount Applied Successfully!
Your savings have been added to the cart.
Report
Block Member?
Please confirm you want to block this member.
You will no longer be able to:
- See blocked member's posts
- Mention this member in posts
- Invite this member to groups
- Message this member
- Add this member as a connection
Please note: This action will also remove this member from your connections and send a report to the site admin. Please allow a few minutes for this process to complete.
Report